Your roof cops a serious beating from the Australian climate. Between the scorching summer sun, heavy downpours, and the occasional hailstorm, it’s no surprise that roofs across the country need some TLC every now and then. The good news? A professional roof restoration can breathe new life into your tired roof without the hefty price tag of a complete replacement.
In this guide, we’ll walk you through everything you need to know about the roof restoration process. You’ll discover the telltale signs that your roof needs attention, understand exactly what happens during each step of the restoration, and learn how to choose the right contractor for the job. Whether you’re dealing with a terracotta tiled roof in Sydney or a Colorbond roof in Perth, this comprehensive breakdown will give you the knowledge you need to protect your biggest investment your home.
What Is Roof Restoration and How Does It Differ from Roof Replacement?
Understanding the Key Differences
Roof restoration involves repairing, cleaning, and recoating your existing roof to extend its lifespan and improve its appearance. Think of it as giving your roof a complete makeover rather than starting from scratch. The process addresses surface damage, minor structural issues, and weathering without removing the existing roofing materials.
Roof replacement, on the other hand, means stripping everything off and installing brand new materials. This is a far more invasive and expensive process, typically reserved for roofs that have suffered significant structural damage or have simply reached the end of their useful life.
When to Choose Restoration Over Replacement
Restoration is your best bet when your roof is structurally sound but showing signs of age and wear. If the underlying framework is solid and damage is limited to the surface level, restoration makes financial sense. Most roofs between 15 and 25 years old are prime candidates for restoration, potentially adding another 10 to 15 years of life to your roof.
Signs Your Roof Needs Restoration
Visible Damage: Cracked, Broken or Missing Tiles
Take a walk around your property and look up. Can you spot any tiles that are cracked, chipped, or completely missing? These are clear indicators that your roof needs professional attention. Even small cracks can allow water to seep through, causing damage to your ceiling and internal structures.
Fading Colour and Weathered Appearance
Has your once-vibrant roof turned into a dull, patchy eyesore? UV exposure and harsh weather conditions cause roof coatings to break down over time. Beyond the aesthetic concerns, faded coatings mean reduced protection against the elements.
Leaks, Moss Growth and Structural Concerns
Water stains on your ceiling are obvious red flags. Moss and lichen growth indicate moisture retention, which can deteriorate tiles and mortar. If you notice sagging sections or your roof seems to be losing its shape, it’s definitely time to call in the professionals for an assessment.
How Long Does a Roof Restoration Take?
Factors Affecting the Timeline
Most residential roof restorations take between two to five days, depending on several factors. The size of your roof plays a major role a small bungalow takes far less time than a sprawling two-storey home. The extent of repairs needed, weather conditions, and the type of roofing material also influence the timeline.
What to Expect During the Process
You’ll generally experience minimal disruption to your daily routine. The team will work during daylight hours, and while there’ll be some noise from pressure washing and equipment, most homeowners can continue their normal activities. Your contractor should provide a clear timeline upfront so you know exactly what to expect.
The Complete Roof Restoration Process: Step by Step
Step 1: Initial Roof Inspection and Assessment
Every quality restoration begins with a thorough inspection. A professional will examine your entire roof, identifying damaged tiles, deteriorating mortar, rusted flashings, and any structural concerns. This assessment determines the scope of work required and forms the basis of your quote.
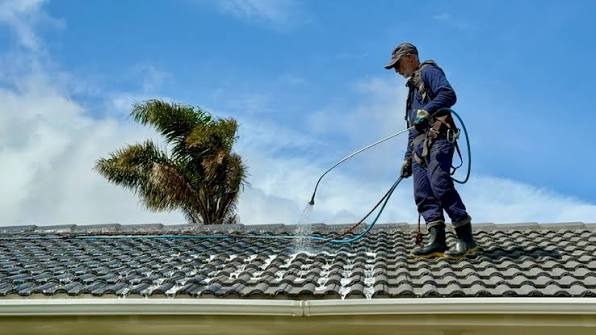
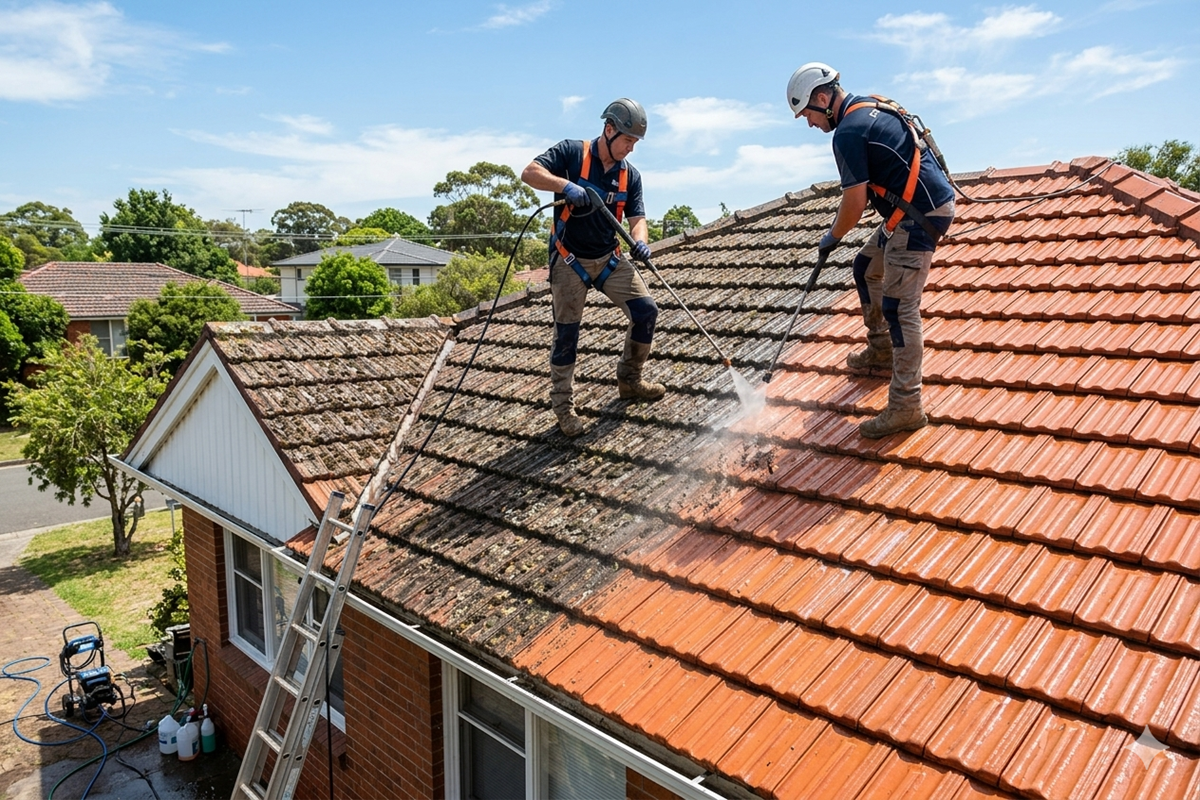
Step 2: Thorough Roof Cleaning and Pressure Washing
Before any repairs can begin, your roof needs a proper clean. High-pressure washing removes years of built-up dirt, moss, lichen, and debris. This step is crucial coatings won’t adhere properly to a dirty surface, and hidden damage often becomes visible once the grime is stripped away.
Step 3: Repairs to Tiles, Ridge Caps and Flashing
With a clean canvas, technicians can address specific damage. Cracked or broken tiles are replaced, and damaged flashings around chimneys, vents, and valleys are repaired or replaced. This step ensures your roof is watertight before any coating work begins.
Step 4: Re-Pointing and Re-Bedding Ridge Capping
The ridge caps along the peak of your roof are secured with mortar that breaks down over time. Re-bedding involves removing old mortar and applying fresh bedding compound, while re-pointing adds a flexible pointing compound on top. This creates a durable, weatherproof seal.
Step 5: Applying Primer and Sealers
A quality primer prepares the surface for the final coating. It helps the topcoat bond properly and provides an extra layer of protection. Depending on your roof type, specific sealers may be applied to address porosity issues or enhance durability.
Step 6: Applying Protective Roof Coating
This is where the transformation really happens. Professional-grade roof coatings are applied typically two coats for optimal protection. These coatings reflect UV rays, resist water penetration, and prevent future moss growth. Plus, you can choose from a wide range of colours to completely refresh your home’s appearance.
Step 7: Final Inspection and Quality Check
A reputable contractor will conduct a final walkthrough to ensure every detail meets their standards. They’ll check coating coverage, verify all repairs are complete, and clean up any debris from the worksite.
Is Roof Restoration Worth It?
Benefits of Professional Roof Restoration
Absolutely, it’s worth it. A professional roof restoration improves your home’s kerb appeal, increases property value, and prevents costly water damage. Modern roof coatings also offer thermal benefits, potentially reducing your energy bills by reflecting heat away from your home.
How Often Should You Restore Your Roof?
Most experts recommend restoring your roof every 10 to 15 years, depending on your local climate and the quality of previous work. Regular inspections every couple of years help you stay ahead of any developing issues.
DIY vs Professional Roof Restoration: What You Need to Know
While some homeowners attempt DIY roof maintenance, restoration is best left to professionals. Working at heights is dangerous, and without proper training, you risk injury or causing additional damage. Professionals have the right equipment, quality materials, and expertise to get the job done safely and effectively.
Protecting Your Investment with Timely Roof Restoration
Your roof is your home’s first line of defence against the elements and looking after it properly just makes sense. A well-timed restoration not only keeps your home looking fantastic but also prevents minor issues from becoming major headaches down the track.
We’ve covered a lot of ground here from recognising the warning signs that your roof needs attention to understanding exactly what happens during each step of the roof restoration process. Armed with this knowledge, you’re now in a great position to make informed decisions about your roof’s future.